File uploading using multer
Background
File upload is a common task in web development, that allows users to upload files to a server, then the server will store the file in a specific folder, and the user can retrieve the file from the server by hitting the route.
The file can be an image, video, audio, pdf, etc. There are many ways to upload a file, and many libraries are available, but in this doc, we will learn how to upload a file using the multer library, store the file in the server, and also how to retrieve the file from the server.
What is multer?
Multer is node.js middleware for handling multipart/form-data, which is primarily used for uploading files to a server. multer is a kind of industry standard for handling file uploads in node.js.
Let's use it
First of all, create a basic express app, if you don't know how to create a basic express app, read the Basic Code docs.
Install multer
Install the multer library which will be used to upload the file.
- npm
- Yarn
- pnpm
- Bun
npm install multer
yarn add multer
pnpm add multer
bun add multer
Create a middleware
We need to create a storage function to store the file on the server, we need to pass the destination and filename to the storage function which will be used to store the file on the server.
import multer from "multer";

// Here we are configuring how multer will store the file
const storage = multer.diskStorage({
  // detination is used to determine within which folder 📁 the uploaded files would be stored
  destination: (req, file, cb) => {
    // ⚠️ public folder 📁 must be created in the root directory of the project
    cb(null, "public/"); //
  },
  // filename is used to determine what the file should be named inside the folder
  filename: (req, file, cb) => {
    cb(null, file.originalname); // For now, we are using the original name of the file
  },
});

// upload variable is a middleware that will be used in the route to store the file in the server
const upload = multer({ storage });

export default upload;
We passed the destination and filename to the multer.diskStorage function, and the multer.diskStorage function returns a middleware that will be used to store the file in the server.
destination: Used to determine within which folder the uploaded files should be stored. The callback function accepts two arguments, the first is anerror, and the second is thepathwhere the files should be stored.filename: Used to determine what the file should be named inside the folder. The callback function accepts two arguments, the first is anerror, and the second is thenameof the file. If an error occurs, you can pass it to the callback function.
The upload variable is a middleware that will be used in the route to store the file in the server.
The public folder must be created in the root directory, otherwise, it will throw an error. You can change the name of the folder, but make sure to change the name in the destination function as well.
I am storing files on the server, but you normally store files on cloud storage like AWS S3, Google Cloud Storage, etc. We'll cover this in another doc.
Create a route to upload the file
Now, we need to create a route to upload the file, we will use the upload.single("file") middleware to upload the file, and the file is the name of the file that we will send from the frontend.
import express from "express";
import upload from "./upload.js"; // import the upload middleware

const app = express();

app.use(express.json());
//  This is required to parse the form data, must for file upload
app.use(express.urlencoded());

// This is the route to upload the file
app.post("/upload", upload.single("file"), (req, res) => {
  // req.file contains information of the uploaded file, like file name, path, etc
  const downloadLink = `${req.protocol}://${req.get("host")}/${req.file.path}`;
  // link will be like http://localhost:3000/public/IMG_20190720_123456.jpg

  // Return the download link to the client
  res.send("File uploaded successfully. Download link: " + downloadLink);
});

app.listen(3000, () => {
  console.log("Server is running on port 3000");
});
Here, we are using the upload.single("file") middleware to upload the file, and the file is the name of the file that we will send from the frontend. And there are other methods as well, like:
upload.array("file", 3): This method is used to upload multiple files, and the second parameter is the maximum number of files that can be uploaded.upload.fields([{ name: "file", maxCount: 1 }]): This method is used to upload multiple files, and the second parameter is an array of objects, and each object contains the name of the file and the maximum number of files that can be uploaded.upload.none(): This method is used to upload only text fields and no files.upload.any(): This method is used to upload any type of file.upload.single("file"): This method is used to upload a single file.
Create a route to download the file
So, the file is being uploaded to the server, in stored in the public folder, but how can we retrieve the file from the server? We need to create a route to retrieve the file from the server. We can use the express.static middleware to create a route to retrieve the file from the server.
What is express.static?
express.static is a built-in middleware in express used to create a GET route that takes the file name as a parameter, and serves static files, such as images, CSS files, and JavaScript files from the server.
To create a route using express.static middleware, we need to pass the path of the folder where the files are stored, like this:
app.use("/public", express.static("public"));

// here, the first parameter is the route, and the second parameter is the path of the folder where the files are stored
// So, now we can access the files using the GET http://localhost:3000/public/<file-name> route
Now, for example, the public folder has a file named exmaple.jpg, then we can access the file using the GET http://localhost:3000/public/example.jpg route.
Let's do this modification in the index.js file, we need to add the following code:
import express from "express";
import upload from "./upload.js";

const app = express();

app.use("/public", express.static("public"));

app.use(express.json());
// This is required to parse the form data, must for file upload
app.use(express.urlencoded());

// This is the route to upload the file
app.post("/upload", upload.single("file"), (req, res) => {
  const downloadLink = `${req.protocol}://${req.get("host")}/${req.file.path}`;
  // link will be like http://localhost:3000/public/IMG_20190720_123456.jpg

  // Return the download link to the client
  res.send("File uploaded successfully. Download link: " + downloadLink);
});

app.listen(3000, () => {
  console.log("Server is running on port 3000");
});
As already mentioned, it will create a route GET /public to retrieve the file stored in the public folder. For example, if we have a file named IMG_20190720_123456.jpg in the public folder, then we can retrieve the file by hitting the route http://localhost:3000/public/IMG_20190720_123456.jpg
Testing
Both routes are created, now let's test the routes.
Upload the file
First, hit the route to upload the file, and the response will be the link to retrieve the file from the server.
curl -X POST \
  http://localhost:3000/upload \
  -H 'Content-Type: multipart/form-data' \
  -F file=@/Users/username/Downloads/IMG_20190720_123456.jpg
What is cURL?
cURL is a command-line tool for transferring data using various protocols. In this example, we are using cURL to hit the route to upload the file. You can use any tool to hit the route, like Postman, Insomnia, etc.
If you didn't understand the cURL command, then you can use Postman to hit the route. It's not very important to understand the cURL command, but if you want to learn more about cURL, then you can check out this cURL tutorial.
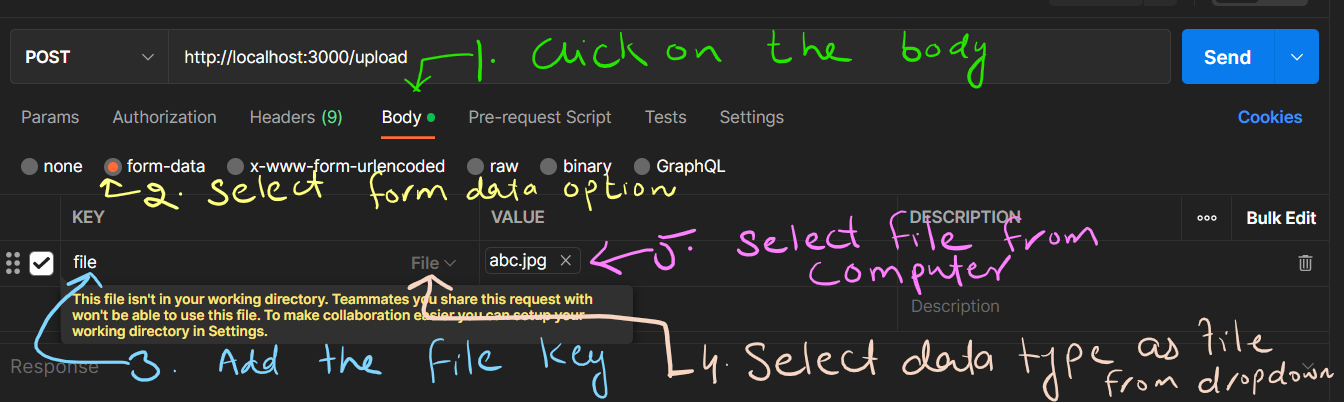
To upload the file from Postman, use the following steps:
- Click on the
Bodysection - Select the
form-dataoption in the body section - Type
filein the key field - Select the data type as
filefrom the dropdowninfoYou need to hover over the data type dropdown to see the
fileoption (it's not visible by default) - Select the file from your computer
Hit the send button, and you will get the response like this:
{
  "message": "File uploaded successfully. Download link: http://localhost:3000/public/IMG_20190720_123456.jpg"
}
Retrieve the file
Now, hit the route to retrieve the file from the server, and you will get the file in the response.
curl -X GET \
  http://localhost:3000/public/IMG_20190720_123456.jpg
Example
Let's create a simple example to upload a file and retrieve the file from the server, which will also store the file's information in the database. Let's start by creating a new project.
Create a new project
First, create a new folder for the project, and then open the terminal in that folder, and run the following command to create a new project:
- npm
- Yarn
- pnpm
- Bun
npm init -y
yarn init -y
pnpm init -y
bun init -y
Install the required libraries
- npm
- Yarn
- pnpm
- Bun
npm install express multer mongoose
yarn add express multer mongoose
pnpm add express multer mongoose
bun add express multer mongoose
- npm
- Yarn
- pnpm
- Bun
npm install -D nodemon
yarn add --dev nodemon
pnpm add -D nodemon
bun add --dev nodemon
Modify the package.json file, and the final version will be like this:
{
  "name": "upload-file",
  "version": "1.0.0",
  "description": "",
  "main": "index.js",
  "type": "module",
  "scripts": {
    "start": "node index.js",
    "dev": "nodemon index.js"
  },
  "author": "@mrizwanashiq",
  "license": "ISC",
  "dependencies": {
    "express": "^4.17.2",
    "mongoose": "^6.5.0",
    "multer": "^1.4.5-lts.1"
  },
  "devDependencies": {
    "nodemon": "^2.0.15"
  }
}
Create Multer middleware middlewares/upload.js
Create a new folder named middlewares and create a new file named upload.js inside the middlewares folder. Then, add the following code to the upload.js file.
import multer from "multer";
import path from "path";

const storage = multer.diskStorage({
  destination: (req, file, cb) => {
    cb(null, "./public");
  },
  filename: (req, file, cb) => {
    const fileName =
      path
        .basename(file.originalname, path.extname(file.originalname))
        .toLowerCase()
        .replace(/\s+/g, "-") +
      "-" +
      Date.now().toString() +
      path.extname(file.originalname).toLowerCase();
    cb(null, fileName);
  },
});

export default multer({ storage });
Here, I made some changes in the filename function, to make the file name unique, if I don't do this, and on the server, I have a file named abc.jpg, and if I upload another file named abc.jpg, then the file will be overwritten (replaced). So, to avoid this,
I am doing the following:
-
Converted the file name to lowercase i.e.
Abctoabc -
Replaced the spaces with
-i.e.abc deftoabc-def -
Added the current timestamp to the file name i.e.
abc-deftoabc-def-1626780000000What is timestamp?Timestamp is the number of milliseconds since January 1, 1970, 00:00:00 UTC. For example, if the current date is 2022-03-10T00:00:00.000Z, then the timestamp will be 1641708800000. You can check the timestamp of the current date using the following code:
console.log(Date.now()); // 1626780000000Why I am using it? Because it will change every time I upload a file, so it will be unique.
-
Added the extension to the file name i.e.
abc-def-1626780000000toabc-def-1626780000000.jpg
So, if the original file name is Abc def.jpg, then the new file name will be abc-def-1626780000000.jpg, and if I upload another file named Abc def.jpg, then the new file name will be abc-def-1626780000001.jpg. So, it will be unique, even if I upload the same file multiple times.
public folderYou must have to create a folder named public in the root directory of the project, otherwise, you will get an error.
Create models/file.js file
Create a new folder named models and create a new file named file.js inside the models folder. Then, add the following code to the file.js file.
import mongoose from "mongoose";

const schema = mongoose.Schema({
  name: { type: String, required: true }, // file name
  original_name: { type: String, required: true }, // original file name
  path: { type: String, required: true }, // path to the file in the server
  type: { type: String, required: true }, // type of the file (image, video, audio, etc)
  link: { type: String }, // link to the file in the server
});

export default mongoose.model("File", schema);
You see, I am storing both, the original file name, and the new file name. The original file name is the file name that the user uploaded, and the new file name is the file name that I am generating using the filename function in the middlewares/upload.js file.
Create routes/file.js file
Create a new folder named routes and create a new file named file.js inside the routes folder. Then, add the following code to the file.js file.
import express from "express";
const router = express.Router();
import upload from "../middlewares/upload.js";
import FileModel from "../models/file.js";

router.get("/", async (req, res) => {
  try {
    const data = await FileModel.find();
    res.status(200).json(data);
  } catch (error) {
    res.status(500).send(error);
  }
});

router.get("/:id", async (req, res) => {
  try {
    const data = await FileModel.findById(req.params.id);
    res.status(200).json(data);
  } catch (error) {
    res.status(500).send(error);
  }
});

router.post("/", upload.single("file"), async (req, res) => {
  try {
    if (req.file) {
      req.file.path = req.file.path.replace(/\\/g, "/"); // replace \\ with / in the file path
      // It's not necessary, it will just make the file path look good to the user
      // For example, if the file path is public\\abc-def-1626780000000.jpg, then it will be public/abc-def-1626780000000.jpg
      // If you don't want to do this, then you can remove this line

      const file = {
        link: `${req.protocol}://${req.get("host")}/${req.file.path}`,
        name: req.file.filename,
        original_name: req.file.originalname,
        type: req.file.mimetype,
        path: req.file.path,
      };
      const data = await FileModel.create(file);
      res.status(200).json(data);
    } else {
      res.status(400).send("no file found");
    }
  } catch (error) {
    res.send(error);
  }
});

router.patch("/:id", async (req, res) => {
  try {
    if (req.file) {
      req.file.path = req.file.path.replace(/\\/g, "/");

      const file = {
        link: `${req.protocol}://${req.get("host")}/${req.file.path}`,
        name: req.file.filename,
        original_name: req.file.originalname,
        type: req.file.mimetype,
        path: req.file.path,
      };
      const data = await FileModel.findByIdAndUpdate(req.params.id, file);
      res.status(200).json(data);
    } else {
      res.status(400).send("no file found");
    }
  } catch (error) {
    res.status(500).send(error);
  }
});

router.delete("/:id", async (req, res) => {
  try {
    const data = await FileModel.findByIdAndRemove(req.params.id);
    res.status(200).json(data);
  } catch (error) {
    res.status(500).send(error);
  }
});

export default router;
Create an index.js file
import express from "express";
import mongoose from "mongoose";
import fileRouter from "./routes/file.js";

const app = express();
app.use(express.json());
app.use(express.urlencoded({ extended: true }));
app.use("/public", express.static("public"));
app.use("/file", fileRouter);

const connection = mongoose.connection;
connection.once("connected", () => console.log("Database Connected ~"));
connection.on("error", (error) => console.log("Database Error: ", error));
mongoose.connect("mongodb://127.0.0.1:27017/db");

app.listen(2022, () => console.log("Server Started ~"));
Run the server
Run the following command to run the server.
npm run dev
Test the API
Now, we can test the API using Postman.
Upload a file
Upload a file using the POST method on the http://localhost:2022/file endpoint.
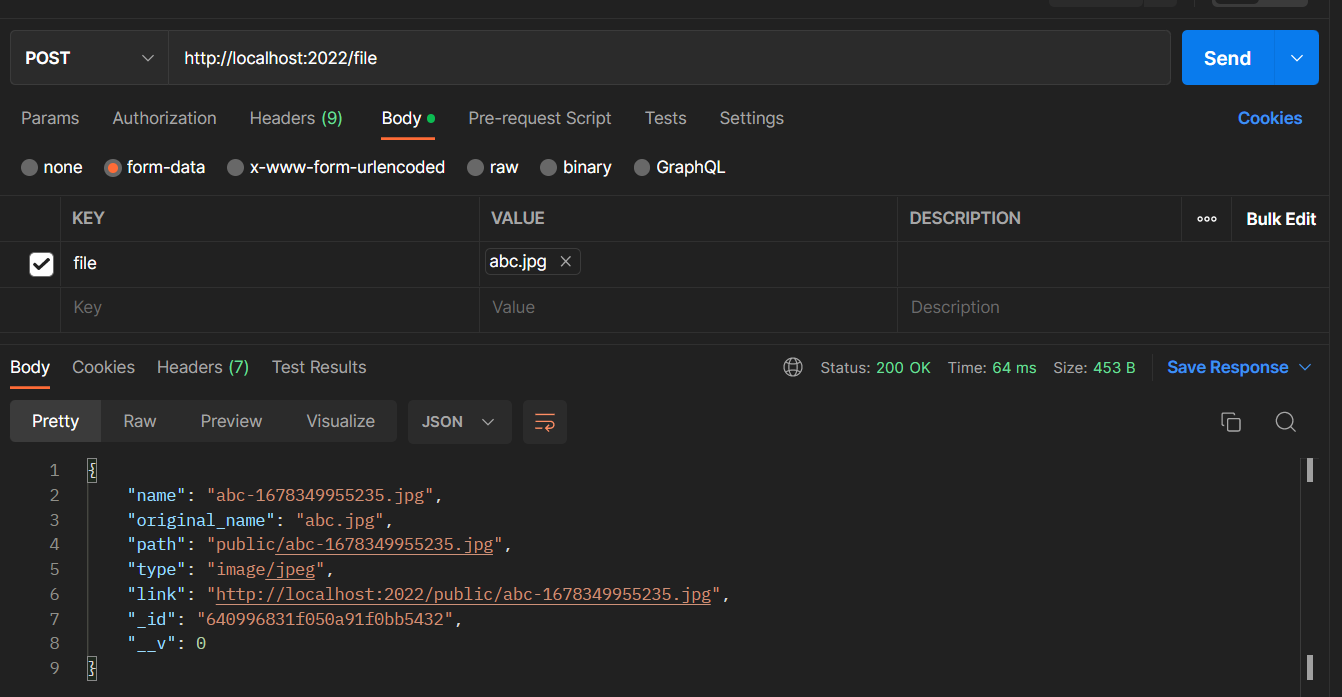
It will return the following response:
{
  "name": "abc-1678349955235.jpg",
  "original_name": "abc.jpg",
  "path": "public/abc-1678349955235.jpg",
  "type": "image/jpeg",
  "link": "http://localhost:2022/public/abc-1678349955235.jpg",
  "_id": "640996831f050a91f0bb5432",
  "__v": 0
}
Get all files
Get all files using the GET method on the http://localhost:2022/file endpoint.
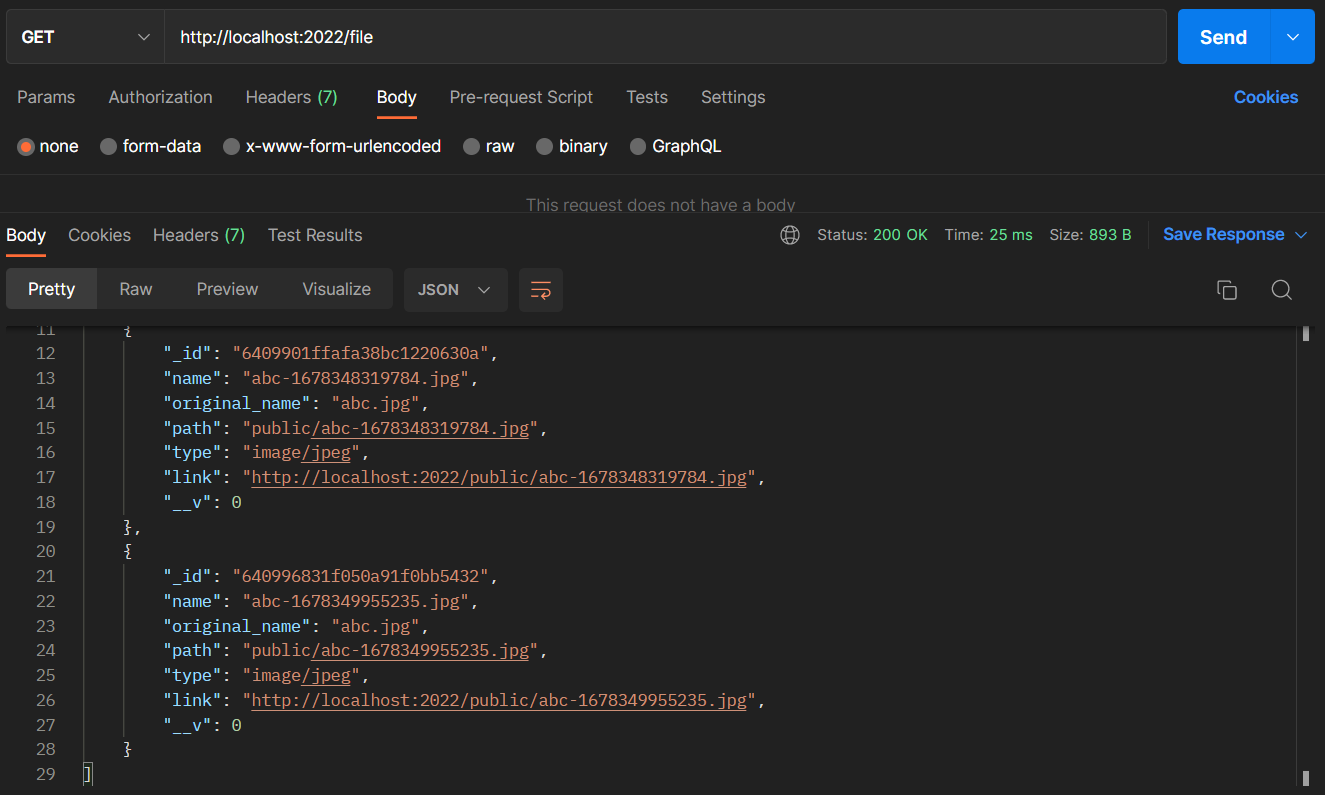
It will return the following response:
[
  {
    "_id": "6409901ffafa38bc1220630a",
    "name": "abc-1678348319784.jpg",
    "original_name": "abc.jpg",
    "path": "public/abc-1678348319784.jpg",
    "type": "image/jpeg",
    "link": "http://localhost:2022/public/abc-1678348319784.jpg",
    "__v": 0
  },
  {
    "_id": "640996831f050a91f0bb5432",
    "name": "abc-1678349955235.jpg",
    "original_name": "abc.jpg",
    "path": "public/abc-1678349955235.jpg",
    "type": "image/jpeg",
    "link": "http://localhost:2022/public/abc-1678349955235.jpg",
    "__v": 0
  }
]
Get a file
Get a file using the GET method on the http://localhost:2022/file/:id endpoint.
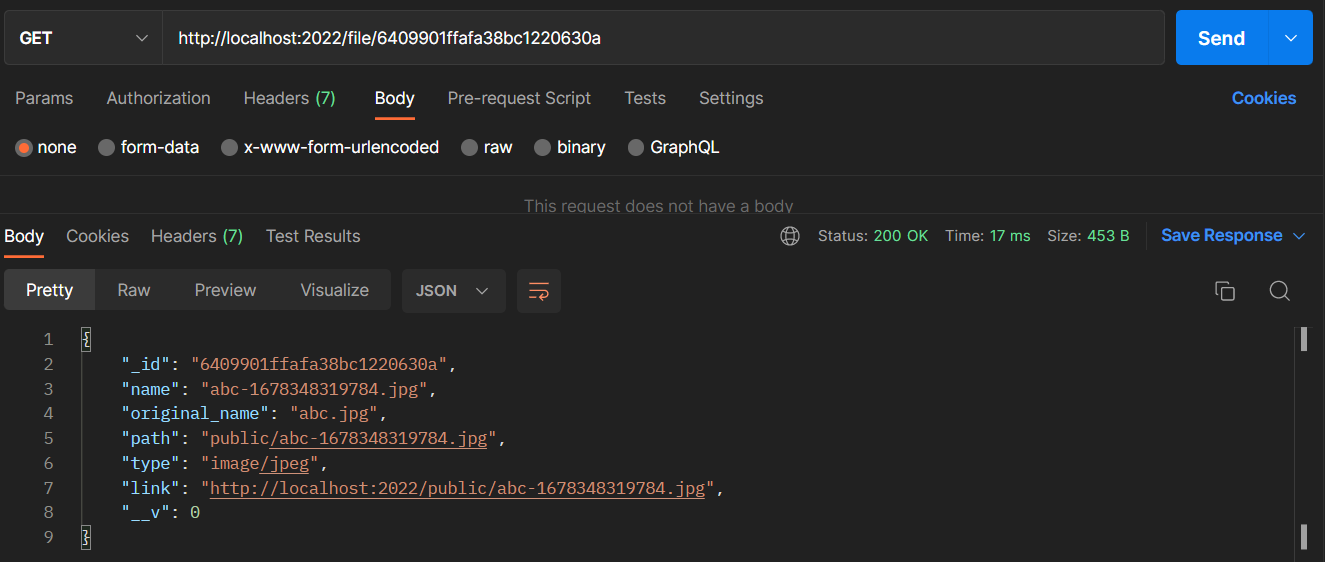
It returns a response like this:
{
  "_id": "6409901ffafa38bc1220630a",
  "name": "abc-1678348319784.jpg",
  "original_name": "abc.jpg",
  "path": "public/abc-1678348319784.jpg",
  "type": "image/jpeg",
  "link": "http://localhost:2022/public/abc-1678348319784.jpg",
  "__v": 0
}
Same way, you can test the PATCH and DELETE methods.
Code
You can download the related code from here.
Conclusion
In this tutorial, we have learned how to upload a file using multer library, store the file in the server, and also how to retrieve the file from the server.