Authentication using JWT
Introduction
JWT stands for JSON Web Token. It is a JSON-based open standard (RFC 7519) for creating and transmitting access tokens, which can be used for secure authentication and authorization in web applications. It is compact, readable, and digitally signed using a secret key. So the integrity and authenticity of the token can be verified by other parties involved. Parties can be a client, server, or any other entity.
JWT can also carry information about the user, such as their name, email, and role, which can be used for different purposes, such as access control, personalization, and auditing.
The purpose of using JWT is not to hide data but to ensure the authenticity of the data. JWT is signed and encoded, not encrypted. Anyone can decode the JWT, and read the data, but the data can't be modified, or tampered with, without the secret key.
JWT is a stateless authentication mechanism, let me give you an example to understand this:
- Imagine you are going to a party, and the security guard gives you a stamp on your hand to enter the party.
- You can enter the party, and the security guard will check the stamp on your hand to verify that you are allowed to enter the party.
- The stamp is like a JWT, which contains information about you (like your name, age, etc.), and the security guard can verify the stamp without checking any database.
The Need for JSON Web Tokens
There are several reasons why applications use JSON Web Tokens for authentication:
JWTis an excellent choice to be passed in HTML and HTTP environments due to its smaller footprint when compared to other types of tokensJWTcan be signed using a secret key, which makes it possible to verify the integrity of the token and the authenticity of the issuerJWTis also suitable for implementing authorization in large-scale web applications- JSON is a widely used data format, and JWT is based on JSON, making it easy to work with in web applications
Structure of JWT
A JWT consists of base64 of three parts separated by dots .:
header.payload.signature

Header
JWT header consists of token type and algorithm used for signing and encoding. Algorithms can be HMAC, SHA256, RSA, HS256, or RS256.
{
  "typ": "JWT",
  "alg": "HS256"
}
Payload
Contains the claims that provide information about a user who has been authenticated along with other information such as Expiration time (exp), Issued at (iat)
- Do not put large data in claim sets. Claim sets are meant to be compact.
- Do not put sensitive information since JWT can be decoded easily.
{
  "id": 1234567890,
  "name": "M Rizwan Ashiq",
  "role": "admin",
  "iat": 1516239022
}
Signature
The signature is the most important part of a JSON Web Token(JWT). Signature is calculated by encoding the header and payload using Base64url Encoding and concatenating them with a period separator. Which is then given to the cryptographic algorithm.
// signature algorithm
HMACSHA256(`${base64(header)}.${base64(payload)}`, "temporary - secret");
So when the header or payload changes, the signature has to be calculated again. Only the Identity Provider(IdP) has the private key to calculate the signature which prevents tampering with the token.
When to use JSON Web Tokens
Some scenarios where JSON Web Tokens are useful:
Authorization
This is the most common scenario for using JWT. Once the user is logged in, each subsequent request will include the JWT, allowing the user to access routes, services, and resources that are permitted with that token.
Information Exchange
JSON Web Tokens are a good way of transferring information between parties. Since JWTs can be signed, the information can be verified and trusted.
Stateless Authentication
Each request to the server is stateless, meaning the server doesn't have to store the session information. The server can validate the token and send the response.
Let's Implement JWT in Express
The auth server (in a small app the login API) generates a JWT certifying user identity, and the Resource server decodes and verifies the authenticity of the token using a secret key.
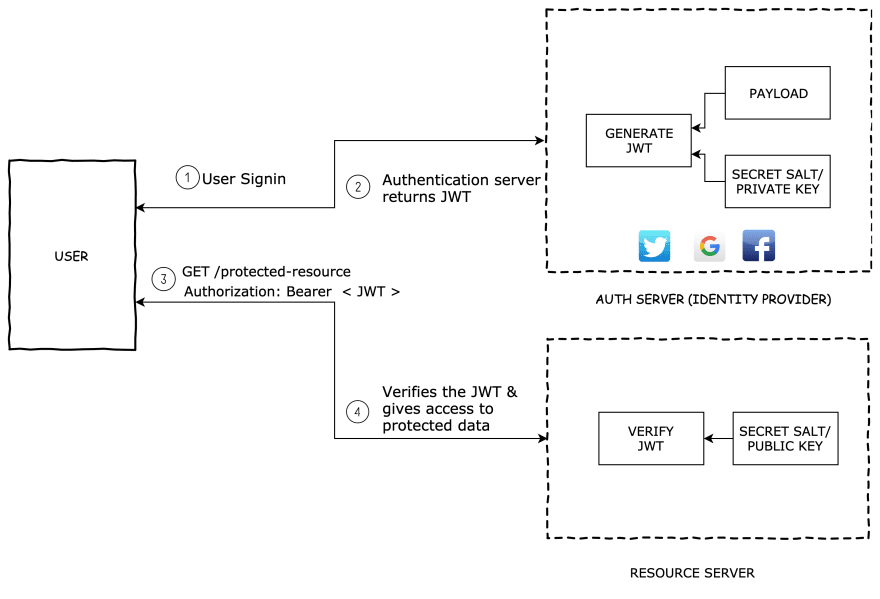
- User sign-in using credentials (email, password).
- The authentication server verifies the credentials and issues a JWT signed using either a secret key.
- User's Client uses the JWT to access protected resources by passing the JWT in the
Authorizationheader. - The resource server then verifies the authenticity of the token using the same secret key.
Here's how to implement JWT in Express:
- Generate a JWT in the login API
- Verify the JWT in the protected API (API that requires authentication)
Before we start, let's do some setup code like creating a new Express app and installing the required packages, and creating a simple API to register and login users.
- npm
- Yarn
- pnpm
- Bun
npm init -y
npm install express
yarn init -y
yarn add express
pnpm init -y
pnpm add express
bun init -y
bun add express
password-hash package
We'll use the password-hash package to hash the password before storing it in the database. This package will help us to hash the password and verify the password.
- npm
- Yarn
- pnpm
- Bun
npm install password-hash
yarn add password-hash
pnpm add password-hash
bun add password-hash
Generally, nobody stores the password in plain text in the database. It is always a good practice to hash the password before storing it in the database. Hashing is a one-way process, which means you can't convert the hashed password back to the original password. When the user logs in, the password entered by the user is hashed and compared with the hashed password stored in the database.
import express from "express";
import passwordHash from "password-hash";

const app = express();
app.use(express.json());

// not using database (to keep it simple, and focus on the JWT part), just array, to store users
const users = [];

app.post("/register", (req, res) => {
  // first check if the user already exists
  const user = users.find((user) => user.email === req.body.email);
  if (user) {
    return res.status(400).json({ message: "User already exists" });
  }

  // if user does not exist, create a new user

  // let's say we have a user object like this
  // { username: 'user1', email: 'user@email.com', password: 'Password@123', admin: true }

  // first, hash the password
  req.body.password = passwordHash.generate(req.body.password);
  // hashing the password will convert the normal password to a hashed password
  // this password `Password@123` would look like this after hashing `$2a$10$1Q7Zz1Q7Zz1Q7Zz1Q7Zz1O1Q7Zz`

  // generate a unique id for the user
  req.body.id = users.length + 1;

  // add the user to the users array
  users.push(req.body);

  res.json({ message: "User registered successfully" });
});

app.post("/login", (req, res) => {
  // Find the user with the given email
  const user = users.find((user) => user.email === req.body.email);

  // if email does not exist, return 401
  if (!user) {
    return res.status(401).json({ message: "Email not found" });
  }

  // if email exists, check the password
  if (!passwordHash.verify(req.body.password, user.password)) {
    return res.status(401).json({ message: "Invalid password" });
  }

  // if we are here, it means the user is authenticated

  // =============== JWT Generation will be here ===============

  res.json({ message: "Login successful" });
});

// API that requires authentication (means the client should send the token in the header)
app.get("/api", (req, res) => {
  res.json({ message: "Welcome to the API" });
});

app.listen(3000, () => {
  console.log("Server started on port 3000");
});
Step 1: Generating a JWT
To generate a JWT in Node.js, we can use the jsonwebtoken library. First, install the jsonwebtoken package:
- npm
- Yarn
- pnpm
- Bun
npm install jsonwebtoken
yarn add jsonwebtoken
pnpm add jsonwebtoken
bun add jsonwebtoken
Then, import the jsonwebtoken library in your code:
import jwt from "jsonwebtoken";
To generate a JWT, we'll use the jwt.sign() function. It takes three arguments:
-
payload- an object contains the information to be encoded in the token such as the user ID, name, roles, and any other data that is required to be transmitted between parties. -
secretKey- the key used to sign the token and verify its authenticity. It is important to keep the secret confidential, as anyone who has access to it can generate a token that appears to be valid. -
options- an object that allows you to specify additional configuration values that control the behavior of thejwt.sign()function.Here are some of the options that you can use:
expiresIn: A string or number representing the time after which the token will expire. For example, you can pass1hto indicate that the token will expire after one hour.algorithm: The algorithm used to sign the token. For example, you can use "HS256" to specify the HMAC-SHA256 algorithm.issuer: The issuer of the token. This is typically a string value representing the entity that is responsible for issuing the token.subject: The subject of the token, typically a string value representing the entity that the token is about.audience: The intended audience of the token, typically a string or array of strings representing the entities that are intended to receive the token.
infoDefault Options for jwt.sign()algorithm: The default algorithm used isHS256(HMAC-SHA256) - which is a symmetric algorithm.- The rest of the options are not specified by default. You can specify them if you want to.
Syntax for generating a JWT:
import jwt from "jsonwebtoken";

// Secret key used to sign the token
const secretKey = "secretKey";

// Payload to be encoded in the token
const payload = {
  userId: 123,
  username: "user1",
  admin: true,
};

// Options to configure the token
const options = {
  expiresIn: "1h",
  algorithm: "HS256",
};

// Generate the token
const token = jwt.sign(payload, secretKey, options);

// Output the token

console.log(token);
// eyJhbGciOiJIUzI1NiIsInR5cCI6IkpXVCJ9.eyJzdWIiOiIxMjM0NTY3ODkwIiwibmFtZSI6IkpvaG4gRG9lIiwiYWRtaW4iOnRydWV9.TJVA95OrM7E2cBab30RMHrHDcEfxjz1I8dUz27aevlE
Normally, backend servers generate the JWT while doing the authentication process.
Now let's generate a JWT in the login API:
import express from "express";
import passwordHash from "password-hash";
import jwt from "jsonwebtoken";

const app = express();
app.use(express.json());

// not using database (to keep it simple, and focus on the JWT part), just array, to store users
const users = [];

app.post("/register", (req, res) => {
  // first check if the user already exists
  const user = users.find((user) => user.email === req.body.email);
  if (user) {
    return res.status(400).json({ message: "User already exists" });
  }

  // if user does not exist, create a new user

  // let's say we have a user object like this
  // { username: 'user1', email: 'user@email.com', password: 'Password@123', admin: true }

  // first, hash the password
  req.body.password = passwordHash.generate(req.body.password);
  // hashing the password will convert the normal password to a hashed password
  // this password `Password@123` would look like this after hashing `$2a$10$1Q7Zz1Q7Zz1Q7Zz1Q7Zz1O1`

  // generate a unique id for the user
  req.body.id = users.length + 1;

  // add the user to the users array
  users.push(req.body);

  res.json({ message: "User registered successfully" });
});

app.post("/login", (req, res) => {
  // Find the user with the given email
  const user = users.find((user) => user.email === req.body.email);

  // if email does not exist, return 401
  if (!user) {
    return res.status(401).json({ message: "Email not found" });
  }

  // if email exists, check the password
  if (!passwordHash.verify(req.body.password, user.password)) {
    return res.status(401).json({ message: "Invalid password" });
  }

  // if we are here, it means the credentials are correct, and the user is authenticated

  // Payload to be encoded in the token
  const payload = {
    userId: user.id,
    username: user.username,
    email: user.email,
    admin: user.admin,
  };

  // Generate the token
  const token = jwt.sign(payload, "secretKey"); // did not specify options

  // Send the token to the client
  res.json({ message: "Login successful", token });
});

app.listen(3000, () => {
  console.log("Server started on port 3000");
});
The "secretKey" string above is only for illustration. In a real app, store the secret in an environment variable and load it at runtime:
const token = jwt.sign(payload, process.env.JWT_SECRET, { expiresIn: "1h" });
Add JWT_SECRET=<a-long-random-string> to your .env file and never commit it to version control.
Step 2: Verifying (Authenticating) a JWT
We've generated a JWT in the login API. Now, let's verify the JWT in the protected API (API that requires authentication).
To call an API that requires authentication, the client should send the token in the header. The server will verify the token and send the response.
In the header, the client should send the token like this:
Authorization: Bearer <token>
The token is the JWT that you generated in the previous step (while logging in).
It will be like this
Authorization: Bearer eyJhbGciOiJIUzI1NiIsInR5cCI6IkpXVCJ9.eyJzdWIiOiIxMjM0NTY3ODkwIiwibmFtZSI6IkpvaG4gRG9lIiwiYWRtaW4iOnRydWV9.TJVA95OrM7E2cBab30RMHrHDcEfxjz1I8dUz27aevlE
To verify the JWT, we'll use jwt.verify() function. It takes the token and the secret key as arguments. If the token is valid, the function will return the decoded payload. If the token is invalid, the function will throw an error.
import express from "express";
import jwt from "jsonwebtoken";
import passwordHash from "password-hash";

const app = express();
app.use(express.json());

// not using database (to keep it simple, and focus on the JWT part), just array, to store users
const users = [];

app.post("/register", (req, res) => {
  // first check if the user already exists
  const user = users.find((user) => user.email === req.body.email);
  if (user) {
    return res.status(400).json({ message: "User already exists" });
  }

  // if user does not exist, create a new user

  // let's say we have a user object like this
  // { username: 'user1', email: 'user@email.com', password: 'Password@123', admin: true }

  // first, hash the password
  req.body.password = passwordHash.generate(req.body.password);
  // hashing the password will convert the normal password to a hashed password
  // this password `Password@123` would look like this after hashing `$2a$10$1Q7Zz1Q7Zz1Q7Zz1Q`

  // generate a unique id for the user
  req.body.id = users.length + 1;

  // add the user to the users array
  users.push(req.body);

  res.json({ message: "User registered successfully" });
});

app.post("/login", (req, res) => {
  // Find the user with the given email
  const user = users.find((user) => user.email === req.body.email);

  // if email does not exist, return 401
  if (!user) {
    return res.status(401).json({ message: "Email not found" });
  }

  // if email exists, check the password
  if (!passwordHash.verify(req.body.password, user.password)) {
    return res.status(401).json({ message: "Invalid password" });
  }

  // if we are here, it means the user is authenticated

  // Payload to be encoded in the token
  const payload = {
    userId: user.id,
    username: user.username,
    email: user.email,
    admin: user.admin,
  };

  // Generate the token
  const token = jwt.sign(payload, "secretKey"); // did not specify options

  // Send the token to the client
  res.json({ message: "Login successful", token });
});

// API that requires authentication (means the client should send the token in the header)
app.get("/api", (req, res) => {
  const token = req.header("authorization");
  if (!token) return res.status(401).send("Access denied. No token provided.");

  // The token will be in the format "Bearer <token>", we need to remove Bearer and take only the token
  const bearerToken = token.split(" ")[1];

  try {
    const decoded = jwt.verify(bearerToken, "secretKey");
    // decoded has the same payload object, that we put while generating token

    console.log(decoded); // { userId: 123, username: "user1", admin: true }
    res.json({ message: `Welcome ${decoded.username}` });
  } catch (ex) {
    // If secretKey is not valid, or any other issue, it will land in the catch block
    res.status(400).send("Invalid token.");
  }
});

app.listen(3000, () => {
  console.log("Server started on port 3000");
});
Middleware for Verifying JWT
To decode the payload from the token, we need to do the same thing in every API that requires authentication, same thing means same thing, like:
- Get the token from the header
- Remove the
Bearerfrom the token - Verify the token
- If the token is valid, get the payload, and use it
- If the token is invalid, send an error response
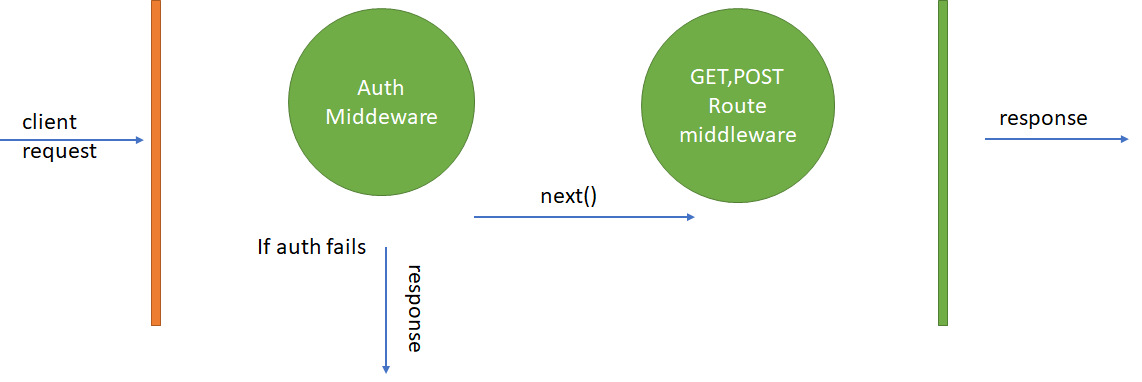
For example, we've only one API that requires authentication, so we can do the same thing in that API. But what if we have dozens of APIs that require authentication? We can't repeat the same code in every API. So, we can create a special function that will do the same thing, and we can use that function in every API that requires authentication. This special function is called middleware.
If you are not familiar with Express middleware, read the What is Middleware?, it will help you understand the concept of middleware.
The middleware is a function that takes parameters of (req, res, next).
- The
reqis the request that is normally used to access the request data, likereq.headers,req.body - The
resis the response that can be sent back to the user in a multitude of ways (res.status(200),res.json(), etc.). - The
next()can be called to move the execution past the piece of middleware and into the actualapp.getserver response or next middleware.
Middleware will look like this:
import jwt from "jsonwebtoken";

const authenticate = (req, res, next) => {
  const token = req.header("authorization");
  if (!token) return res.status(401).send("Access denied. No token provided.");

  // The token will be in the format "Bearer <token>", we need to remove Bearer and take only the token
  const bearerToken = token.split(" ")[1];

  try {
    const decoded = jwt.verify(bearerToken, "secretKey");
    // decoded has the same payload object, that we put while generating token

    req.user = decoded;
    // We assign the decoded token (payload) to req.user
    // We can use req.user throughout the API to get the user's information
    // that we put in the payload while generating the token

    next();
  } catch (ex) {
    // If secretKey is not valid, or any other issue, it will land in the catch block
    res.status(400).send("Invalid token.");
  }
};

export default authenticate;
Now, we can use this middleware in any API that requires authentication. For example, let's say we have an API /api that requires authentication. We can use the authenticate middleware like this:
import authenticate from "./middlewares/authenticate.js";

app.get("/api", authenticate, (req, res) => {
  console.log(req.user); // { userId: 123, username: "user1", admin: true }
  res.json({ message: "Welcome to the API" });
});

// ...
This code will authenticate the token provided by the client, you see before (req, res) => {}, I added another authenticate function, that'll act as the middleware. If the request has a valid JWT, then it will proceed to (req, res) => {} otherwise the authenticate function will send res.status(401).json({ message: 'Invalid token.' }). So, if JWT is valid, it can proceed to the request. If it is not valid, it can be handled as an error.
How to send JWT from Postman
You can send a JWT from Postman by adding the following header to the request:
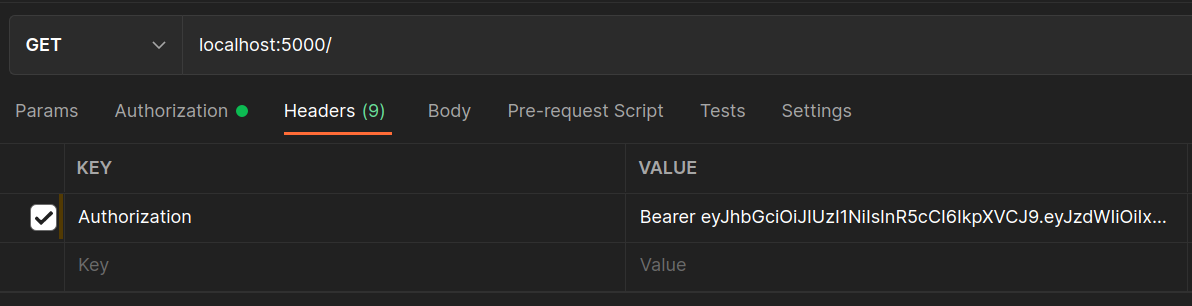
Authorization: Bearer <token>
The token is the JWT that you generated in the previous step (while logging in).
Authorization: Bearer eyJhbGciOiJIUzI1NiIsInR5cCI6IkpXVCJ9.eyJzdWIiOiIxMjM0NTY3ODkwIiwibmFtZSI6IkpvaG4gRG9lIiwiYWRtaW4iOnRydWV9.TJVA95OrM7E2cBab30RMHrHDcEfxjz1I8dUz27aevlE
This is a dummy token. You should not use this token in your application.
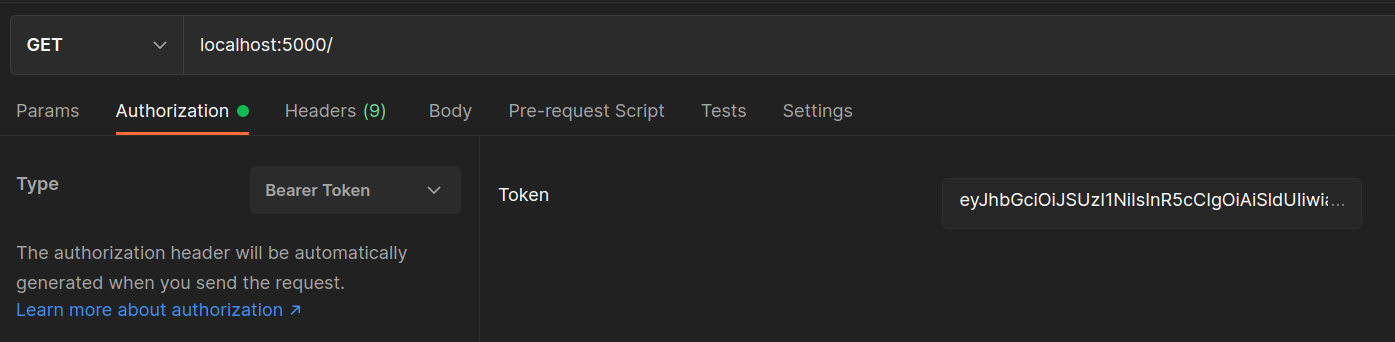
Or you can go to the Authorization tab, click on the dropdown next to Type, and select Bearer Token. Then paste the token in the text box.
Access Token and Refresh Token
So far, we've used a single JWT for everything. In practice, most production apps use two tokens — an access token and a refresh token.
The Problem with a Single Token
A JWT with a long expiry (e.g. 30d) is convenient, but dangerous. If it leaks, an attacker can use it for 30 days. If you shorten the expiry to 15 minutes, users get logged out constantly and have to re-enter their password.
Refresh tokens solve this trade-off.
How They Work Together
┌──────────────────────────────────────────────────────────┐
│  Access Token                Refresh Token               │
├──────────────────────────────────────────────────────────┤
│  Short-lived (15 min)        Long-lived (7–30 days)      │
│  Used on every API request   Used only to get new tokens │
│  Stored in memory/header     Stored in httpOnly cookie   │
│  Contains user info          Contains only user ID       │
└──────────────────────────────────────────────────────────┘
The flow:
1. User logs in → server returns access token + refresh token
2. Client uses access token for all API requests
3. Access token expires (15 min) → server returns 401
4. Client sends refresh token to /refresh endpoint
5. Server validates refresh token → issues new access token
6. If refresh token is also expired → user must log in again
Implementation
import express from "express";
import jwt from "jsonwebtoken";
import passwordHash from "password-hash";

const app = express();
app.use(express.json());

const users = [];

// In production, store refresh tokens in a database so they can be revoked.
// Here we use an in-memory Set for simplicity.
const validRefreshTokens = new Set();

const ACCESS_SECRET  = process.env.ACCESS_TOKEN_SECRET  || "access-secret";
const REFRESH_SECRET = process.env.REFRESH_TOKEN_SECRET || "refresh-secret";

function generateTokens(payload) {
  const accessToken  = jwt.sign(payload, ACCESS_SECRET,  { expiresIn: "15m" });
  const refreshToken = jwt.sign(payload, REFRESH_SECRET, { expiresIn: "7d" });
  return { accessToken, refreshToken };
}

// ─── Register ────────────────────────────────────────────────────────────────

app.post("/register", (req, res) => {
  const existing = users.find((u) => u.email === req.body.email);
  if (existing) return res.status(400).json({ message: "User already exists" });

  req.body.password = passwordHash.generate(req.body.password);
  req.body.id = users.length + 1;
  users.push(req.body);

  res.json({ message: "User registered successfully" });
});

// ─── Login ───────────────────────────────────────────────────────────────────

app.post("/login", (req, res) => {
  const user = users.find((u) => u.email === req.body.email);
  if (!user) return res.status(401).json({ message: "Email not found" });

  if (!passwordHash.verify(req.body.password, user.password)) {
    return res.status(401).json({ message: "Invalid password" });
  }

  const payload = { userId: user.id, email: user.email };
  const { accessToken, refreshToken } = generateTokens(payload);

  // Store the refresh token so we can validate and revoke it later
  validRefreshTokens.add(refreshToken);

  res.json({ accessToken, refreshToken });
});

// ─── Refresh ─────────────────────────────────────────────────────────────────

app.post("/refresh", (req, res) => {
  const { refreshToken } = req.body;
  if (!refreshToken) return res.status(401).json({ message: "No refresh token" });

  // Reject if the token was revoked (e.g. user logged out)
  if (!validRefreshTokens.has(refreshToken)) {
    return res.status(403).json({ message: "Invalid refresh token" });
  }

  try {
    const decoded = jwt.verify(refreshToken, REFRESH_SECRET);
    const payload = { userId: decoded.userId, email: decoded.email };
    const { accessToken, refreshToken: newRefreshToken } = generateTokens(payload);

    // Rotate: invalidate old refresh token and store the new one
    validRefreshTokens.delete(refreshToken);
    validRefreshTokens.add(newRefreshToken);

    res.json({ accessToken, refreshToken: newRefreshToken });
  } catch {
    return res.status(403).json({ message: "Refresh token expired. Please log in again." });
  }
});

// ─── Logout ──────────────────────────────────────────────────────────────────

app.post("/logout", (req, res) => {
  const { refreshToken } = req.body;
  validRefreshTokens.delete(refreshToken); // revoke the token
  res.json({ message: "Logged out successfully" });
});

// ─── Protected route ─────────────────────────────────────────────────────────

app.get("/api", (req, res) => {
  const authHeader = req.headers.authorization;
  if (!authHeader) return res.status(401).json({ message: "No token provided" });

  const token = authHeader.split(" ")[1];
  try {
    const decoded = jwt.verify(token, ACCESS_SECRET);
    res.json({ message: `Welcome, user ${decoded.userId}` });
  } catch {
    res.status(401).json({ message: "Access token expired or invalid" });
  }
});

app.listen(3000, () => console.log("Server started on port 3000"));
Refresh Token Rotation
Notice we rotate the refresh token on every use — the old refresh token is deleted and a new one is issued alongside the new access token. This means:
- A stolen refresh token can only be used once before it is invalidated
- If an attacker uses a refresh token that was already rotated, the server detects the reuse and can invalidate the whole session
Key Rules
| Rule | Why |
|---|---|
Keep access tokens short-lived (15m) | Limits damage if leaked |
| Store refresh tokens server-side | So they can be revoked on logout or breach |
| Use separate secrets for each token type | A compromised access secret doesn't expose refresh tokens |
| Rotate refresh tokens on every use | Detects token theft via reuse detection |
Send refresh token in an httpOnly cookie in production | JavaScript cannot read it, blocking XSS theft |
ACCESS_TOKEN_SECRET=<long-random-string>
REFRESH_TOKEN_SECRET=<different-long-random-string>
Using the same secret for both tokens means a leaked access token secret can be used to forge refresh tokens.
Code
You can download the related code from here
Summary
In this article, we learned how to implement JWT authentication in an Express.js application. We covered generating and verifying a JWT, using middleware to protect routes, and implementing the access token + refresh token pattern with token rotation and revocation.