What is MongoDB?
What is Mongoose?
To understand what is mongoose, first, we need to understand how MongoDB works.
The basic unit of data we can save in MongoDB is a Document. Although stored as binary (AKA BSON), when we query a database we obtain its representation as a JSON object.
Related documents can be stored in collections, similar to tables in relational databases. This is where the analogy ends though because we define what to consider "related documents". MongoDB doesn't enforce a structure on the documents.
For example, we have a collection of users, and we save a document with the following structure:
{
  "name": "Ashiq"
}
And then in the same collection, we could save a seemingly unrelated document with no shared properties or structure:
{
  "latitude": 53.3498,
  "longitude": 6.2603
}
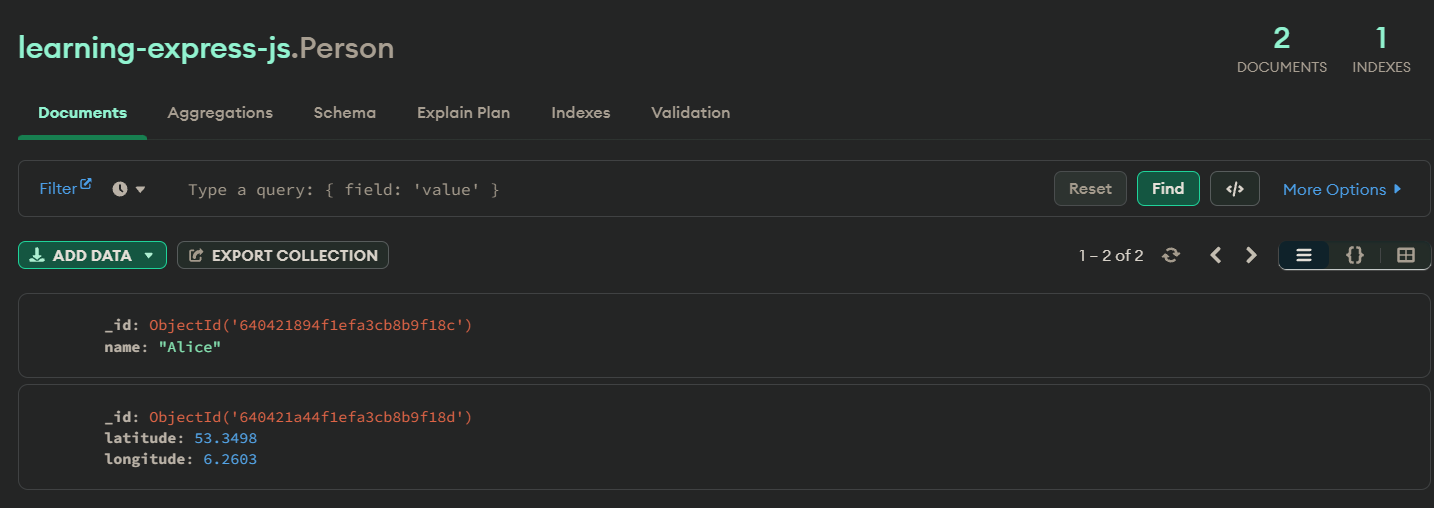
This ☝️ screenshot is from MongoDB Compass, a GUI for MongoDB. It's a great tool to explore and manage your databases.
Here lies the power which is also the weakness of NoSQL databases. We create meaning for our data and store it the way we consider best. The database won't impose any limitations.
Purpose
Although MongoDB won't impose a structure, we may want to do it ourselves. We receive data and need to validate it to ensure what we receive is what we need. We may also need to process the data in some way before saving it. This is where mongoose kicks in.
mongoose is a JavaScript library for Node.js that simplifies working with MongoDB databases. It provides a schema-based solution to define data structures, enforce validation rules, and offer intuitive functions for querying and manipulating data. It is a popular choice for developers looking for a flexible and easy-to-use solution to work with MongoDB in Node.js applications.
Some key uses of mongoose include:
- Schema definition: Provides a way to define the structure of the data in a MongoDB collection. This helps in data validation and prevents incorrect data from being stored in the database.
- Data validation: Provides built-in data validation and can also be extended to perform custom validation. This helps ensure that data stored in the database meets certain standards.
- Object-oriented programming: Maps the data in a MongoDB collection to a JavaScript object. This makes it easy to interact with the data using object-oriented programming concepts, like inheritance and methods.
- Query building: Provides a flexible and powerful way to query the data stored in MongoDB collections. You can chain query methods together to build complex queries.
- Middleware: This provides a way to define middleware that can be executed before or after certain events, like saving data or removing data from the database.
Get Start
- Create Project
- Install Mongoose
- Import Mongoose
- Connect to MongoDB
- Create Schema and Model
- Database Operations
It's a long topic. I am going to divide it into multiple parts. A few parts will be covered in this article and the rest will be covered in the next articles.
Creating Project
Before starting, need to create a project. Create the project like we did in the previous articles. You can use the same project.
So first create a folder, and then open a terminal in that folder and run this command
- npm
- Yarn
- pnpm
- Bun
npm init -y
yarn init -y
pnpm init -y
bun init -y
Installing mongoose
In this project, we'll be using mongoose to work with MongoDB. So, let's install it using the following command:
- npm
- Yarn
- pnpm
- Bun
npm install mongoose --save
yarn add mongoose
pnpm add mongoose
bun add mongoose
This package has everything we need to work with MongoDB like database connection, database operations, etc.
Importing mongoose
To work with mongoose, need to import it into the project, in the file where we want to use it. So, let's import it into the index.js file like this:
import mongoose from "mongoose";
Database Connection
Pass the database connection string to the mongoose.connect() function. The connection string is a URI that identifies the database to connect to. The simplest connection string is for a database on the local machine with the 27017 port:
"mongodb://localhost:27017/test";
Here, localhost is the hostname of the machine where the MongoDB instance is running, 27017 is the port number, and test is the name of the database. If the database doesn't exist, it will be created automatically.
So, let's connect to the database using the mongoose.connect() function like this:
import mongoose from "mongoose";

mongoose.connect("mongodb://localhost:27017/test");
You may see older tutorials passing options like useNewUrlParser: true and useUnifiedTopology: true as a second argument. These options were only needed in Mongoose 5. Since Mongoose 6, they are the default behavior and are deprecated — passing them actually triggers a warning in the console, so just call mongoose.connect() with the connection string alone.
If you pass localhost as the hostname in the mongoose.connect() function, it assumes that the MongoDB server is running locally on the default port and without credentials. You have to install MongoDB locally if you haven't yet
If you are using a different hostname, port, or credentials, you need to modify the connection string accordingly.
You can also specify events listener i.e. connected, error, etc. For example, you can log a message to the console when the connection is established or log an error message if the connection fails.
import mongoose from "mongoose";

mongoose.connect("mongodb://localhost:27017/test");

const connection = mongoose.connection;

// Add event listeners will be called when the connection status changes
connection.once("connected", () => console.log("Database Connected ~"));
connection.once("error", () => console.log("Database Connection Failed ~"));
In some versions of mongoose, it's noticed that you need to pass the IP of localhost 127.0.0.1 like this mongodb://127.0.0.1:27017 instead of mongodb://localhost:27017 to connect to the database. If you are facing any issues, try this.
Connection String Components
Connection String Components
Understanding connect string components is not important for now. You can skip this 👇 section for now. But, I recommend you to read this section (now or) later. It will help you to understand the connection string better.
The connection string can also include other components to specify additional connection options. The following is the standard URI connection scheme:
mongodb://[username:password@]host1[:port1][,host2[:port2],...[,hostN[:portN]]][/[database][?options]]
The standard URI connection string includes the following components:
mongodb://
A required prefix to identify that this is a string in the standard connection format.
username:password@
Optional. If specified, the client will attempt to log in to the specific database using these credentials after connecting to the Mongodb instance.
host1
This is the only required part of the URI. It identifies a server address to connect to. It identifies either:
- hostname
- IP address
- UNIX domain socket.
:port1
Optional. The default value is :27017 if not specified.
hostX
Optional. You can specify as many hosts as necessary. You would specify multiple hosts, for example, for connections to replica sets.
:portX
Optional. The default value is :27017 if not specified.
/database
Optional. The name of the database to authenticate if the connection string includes authentication credentials in the form of username:password@. If /database is not specified and the connection string includes credentials, the driver will authenticate to the admin database.
?options
Connection-specific options are passed as key=value pairs separated by &. Leave it blank if you don't want to specify any options.
What's Next
In the next doc, we'll learn about creating a schema and model in Mongoose.
Conclusion
In this doc, we learned about Mongoose and how to connect to MongoDB using Mongoose.
We'll see more about Mongoose in the next docs.