HTML with JavaScript
HTML and JavaScript Together
HTML and JavaScript are two fundamental technologies used to build web pages. HTML is used to structure and provide content for a webpage, while JavaScript is used to add interactivity and dynamic behavior to the page.
Let's first understand the DOM (Document Object Model) and how JavaScript can be used to access and change HTML elements.
DOM (Document Object Model)
Introduction
It is an interface between document and Javascript that allows developers to interact and control (get, update, add, delete) the Elements. The Document Object Model defines HTML and XML documents as a tree structure, where each node of the tree is an object that represents a part of the document. Using DOM + Javascript developers can access and modify each element of the document. See in the picture below, the document has represented a tree where html, body etc. are the branch that ends with a node like p, ul, li, etc.
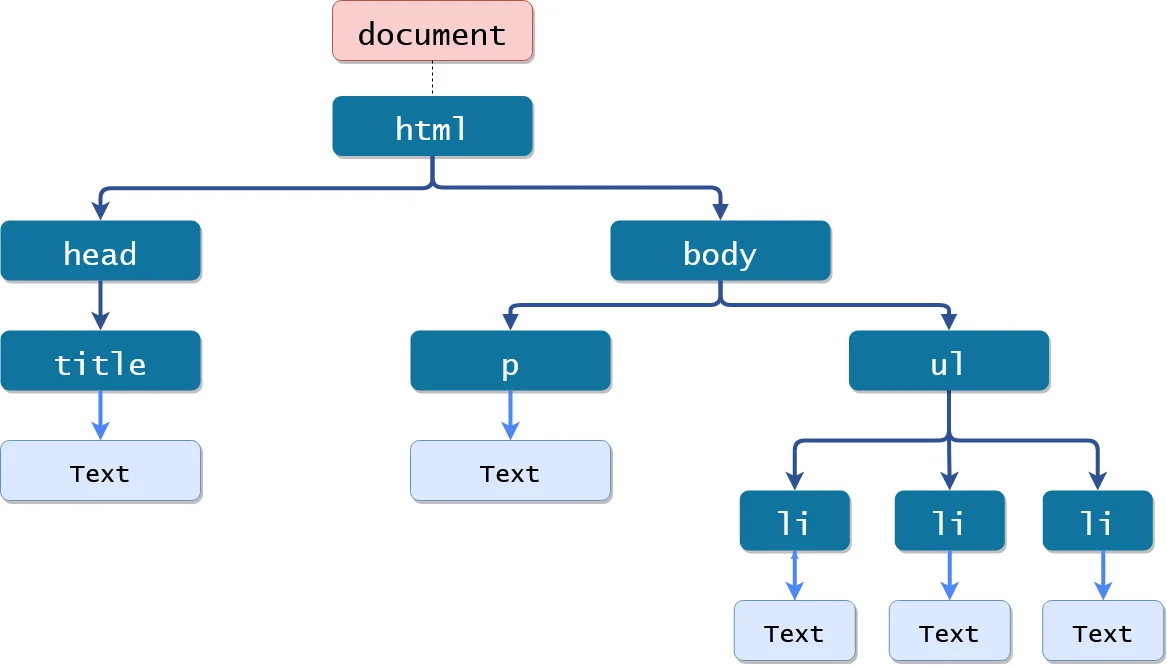
The DOM has a hierarchical structure. The lower elements are children of upper connected elements and side elements having the same parents are called siblings.
Nodes In DOM
The DOM comprises different types of nodes. Each node in the DOM tree is identified by a node type. Each type of node has a different way to access it.
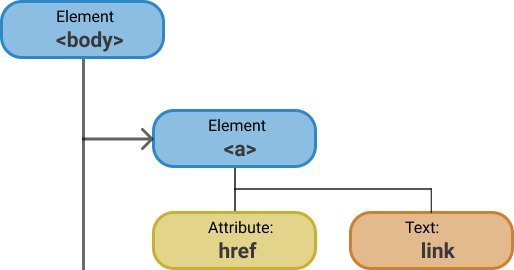
- Element Nodes - called objects in DOM. It comprises most of the DOM which holds other data like text and attributes. Example
p,h1,h2,ul,lietc. The element nodes may have other elements nested inside it which are known as children of that element. - Attribute Nodes - attached to the element node and add extra information to the element like
title attribute,class attributeetc. - Text Node - contents of the elements and have no children like element nodes like
<a href="url">link</a>
Accessing, modifying, removing, and creating elements in DOM
The DOM provides a way to access and manipulate elements in an HTML document. The most common way to access an element in the DOM is by its id, class, or tagName, but there are several other ways to access elements as well, let's take a look:
First of all
What is id, and class?
id, and class are attributes of HTML elements. They are used to identify elements in HTML. We use id to identify a single element, and we use class to identify multiple elements.
document
The document object is the root node of the DOM. It represents the entire HTML document. It is the starting point for accessing and manipulating the DOM. The document object is available in the global scope, so you don't need to do anything to access it.
<div id="myDiv">Hello, world!</div>

<script>
  console.log(document);
</script>
In this example, the document object is used to access the div element with an id of myDiv, and the innerHTML property is then used to get the text content of the div element.
The above is HTML's code, the inside <script> tags, there's JavaScript's code.
To get specific elements from the DOM, you can use the following methods:
getElementById()
Used to get an element by its id. Takes a single argument id of the element you want to access. Here's an example:
<div id="myDiv">Hello, world!</div>

<script>
  const myDiv = document.getElementById("myDiv");
  console.log(myDiv.innerHTML);
  // outputs "Hello, world!"
  myDiv.innerHTML = "updated text";
</script>
It replaces Hello, world! with updated text
I am just doing a console log for the innerHTML, and I am updating the innerHTML of the div element. You can do anything with the innerHTML of the element.
In this example, the getElementById() method is used to access the div element with an id of myDiv, and the innerHTML property is then used to get the text content of the div element.
getElementsByTagName()
To get elements by their tag name, you can use the getElementsByTagName() method. This method takes a single argument, which is the name of the tag you want to access. Here's an example:
<ul>
  <li>Item 1</li>
  <li>Item 2</li>
  <li>Item 3</li>
</ul>

<script>
  const listItems = document.getElementsByTagName("li");
  for (let i = 0; i < listItems.length; i++) {
    console.log(listItems[i].innerHTML);
  }
</script>
In this example, the getElementsByTagName() method is used to access all the li elements in the ul list. The for loop then iterates over the list and logs the innerHTML property of each li element.
You notice that getElementsByTagName() returns an array of elements. This is because there can be multiple elements with the same tag name. For example, a document can have various div elements.
getElementsByClassName()
It is used to get elements by their class name. This method takes a single argument, which is the name of the class you want to access. Here's an example:
<div class="myDiv">Hello, world!</div>

<script>
  const myDiv = document.getElementsByClassName("myDiv");
  console.log(myDiv.innerHTML); // outputs "Hello, world!"
</script>
In this example, the getElementsByClassName() method is used to access the div element with a class of myDiv. The innerHTML property is then used to get the text content of the div element.
querySelector()
<div class="container">
  <p>This is the first paragraph.</p>
  <p>This is the second paragraph.</p>
</div>

<script>
  const firstParagraph = document.querySelector(".container p:first-child");
  console.log(firstParagraph.innerHTML);
</script>
In this example, the querySelector() method is used to access the first p element inside the div with a class of "container". The innerHTML property is then used to get the text content of the p element.
querySelectorAll()
<ul>
  <li>Item 1</li>
  <li>Item 2</li>
  <li>Item 3</li>
</ul>

<script>
  const listItems = document.querySelectorAll("li");

  for (let i = 0; i < listItems.length; i++) {
    console.log(listItems[i].innerHTML);
  }
</script>
In this example, the querySelectorAll() method is used to access all the li elements in the ul list. The for loop then iterates over the list and logs the innerHTML property of each li element.
Update the content of an element
To update the content of an element in the DOM, you can use the innerHTML property. This property sets or returns the HTML content of an element. Here's an example:
<div id="myDiv">Hello, world!</div>

<script>
  const myDiv = document.getElementById("myDiv");
  myDiv.innerHTML = "Goodbye, world!";
</script>
In this example, the innerHTML property is used to update the text content of the div element with an id of "myDiv".
Update the attributes of an element
To update the attributes of an element in the DOM, you can use the setAttribute() method. This method sets the value of an attribute on an element. Here's an example:
<img id="myImage" src="image.jpg" />

<script>
  const myImage = document.getElementById("myImage");
  myImage.setAttribute("src", "new_image.jpg");
</script>
In this example, the setAttribute() method is used to update the src attribute of the img element with an id of "myImage".
Update the style of an element
To update the style of an element in the DOM, you can use the style property. This property sets or returns the style of an element. Here's an example:
<div id="myDiv">Hello, world!</div>

<script>
  const myDiv = document.getElementById("myDiv");
  myDiv.style.color = "red";
</script>
In this example, the style property is used to update the color of the div element with an id of "myDiv".
Add a class to an element
To add a class to an element in the DOM, you can use the classList property. This property sets or returns the classes of an element. Here's an example:
<div id="myDiv">Hello, world!</div>

<script>
  const myDiv = document.getElementById("myDiv");
  myDiv.classList.add("highlight");
</script>
In this example, the classList property is used to add a class of "highlight" to the div element with an id of "myDiv".
Add an event listener
To add an event listener to an element in the DOM, you can use the addEventListener() method. This method takes two arguments: the type of event to listen for and a function to execute when the event is triggered. Here's an example:
<button id="myButton">Click me!</button>

<script>
  const myButton = document.getElementById("myButton");
  myButton.addEventListener("click", function () {
    console.log("You clicked me!");
  });
</script>
In this example, the addEventListener() method is used to add a click event listener to the button element with an id of "myButton". When the button is clicked, the function passed as the second argument is executed.
appendChild()
To add a new element to the DOM, you can use the appendChild() method. This method takes a single argument, which is the element you want to add. Here's an example:
<div id="myDiv"></div>

<script>
  const myDiv = document.getElementById("myDiv");

  const newParagraph = document.createElement("p");
  newParagraph.innerHTML = "Hello, world!";
  myDiv.appendChild(newParagraph);
</script>
In this example, the appendChild() method is used to add a new p element to the div element with an id of "myDiv".
removeChild()
To remove an element from the DOM, you can use the removeChild() method. This method takes a single argument, which is the element you want to remove. Here's an example:
<div id="myDiv">
  <p>Hello, world!</p>
</div>

<script>
  const myDiv = document.getElementById("myDiv");
  const paragraph = document.querySelector("p");
  myDiv.removeChild(paragraph);
</script>
Getting Started
Let's see how JavaScript can be used to add dynamic behavior to HTML pages and how it can be used to access and manipulate HTML elements.
Step 1: Create an HTML file
Create an HTML file named index.html and add the following code:
<!DOCTYPE html>
<html>
  <head>
    <title>Page Title</title>
  </head>
  <body>
    <h1>This is a Heading</h1>
    <p>This is a paragraph.</p>
  </body>
</html>
Step 2: Add a JavaScript file
Create a JavaScript file named script.js and add the following code:
function myFunction() {
  document.getElementById("demo").innerHTML = "Paragraph changed.";
}
Step 3: Link the JavaScript file to the HTML file
To use the JavaScript file in the HTML file, you must link the two files together. Add <script src="script.js"></> to external script reference in <head> or <body> as you like. Our HTML file will look like this:
<!DOCTYPE html>
<html>
  <head>
    <title>Page Title</title>
    <script src="script.js"></script>
  </head>
  <body>
    <h1>This is a Heading</h1>
    <p>This is a paragraph.</p>
  </body>
</html>
You can also add JavaScript code directly to the HTML file. However, this is not recommended because it makes the HTML file difficult to read and maintain.
Step 4: Add a button
Add a button to the HTML file. When the button is clicked, the text of the paragraph will be changed:
<!DOCTYPE html>
<html>
	<head>
		<title>Page Title</title>
		<script src="script.js"></>
	</head>
	<body>
		<h1>This is a Heading</h1>
		<p>This is a paragraph.</p>
		<button type="button" onclick="myFunction()">Try it</button>
	</body>
</html>
Step 5: Add an element to the HTML file
Add an element to the HTML file. The text of the paragraph will be changed when the button is clicked:
<!DOCTYPE html>
<html>
	<head>
		<title>Page Title</title>
		<script src="script.js"></>
	</head>
	<body>
		<h1>This is a Heading</h1>
		<p>This is a paragraph.</p>
		<button type="button" onclick="myFunction()">Try it</button>
		<p id="demo"></p>
	</body>
</html>
Step 6: Run the code
Open the HTML file in a browser to see the result.
Final Code
import Tabs from '@theme/Tabs'; import TabItem from '@theme/TabItem';
<!DOCTYPE html>
<html>
	<head>
		<title>Page Title</title>
		<script src="script.js"></>
	</head>
	<body>
		<h1>This is a Heading</h1>
		<p>This is a paragraph.</p>
		<button type="button" onclick="myFunction()">Try it</button>
		<p id="demo"></p>
	</body>
</html>
function myFunction() {
  document.getElementById("demo").innerHTML = "Paragraph changed.";
}
Explanation
In the example above, we have an HTML file and a JavaScript file. The JavaScript file contains a function named myFunction(). The function is called when the button is clicked. The function changes the text of the paragraph with the id of demo.